Showing posts with label tutorial. Show all posts

Saturday, September 29, 2018

Quilting: candy bucket

I quilted a Halloween quilt recently and the fabric had quite a bit of candy in it.  So I made a candy bucket quilting motif to go with it.


There are three different candies, and they are combined with a meander.

There is a tootsie roll or smarties shaped candy:
There is a peppermint candy, with or without a swirl:

Finally, there is a lollipop.  Again with or without a swirl.  This was my least favorite of the three, because I had a hard time going back on top of the stick.
It's a bit hard to see on the quilt due to the fabrics, but here's what it looked like on the top.

Wednesday, February 24, 2016

Plus quilting

In advance of the upcoming Plus quilt finish, I thought I'd share with you how I did the quilting.  I like it since it matches the quilt piecing design so well.


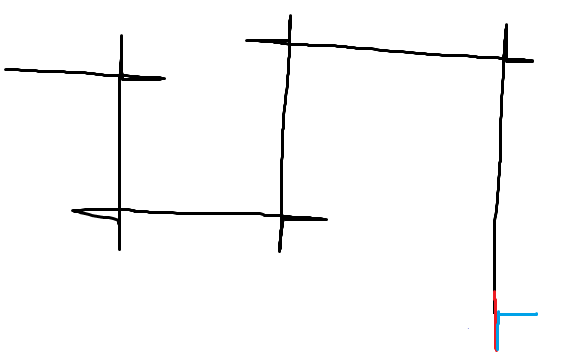
1.  I'm showing the steps after doing a few pluses, but it would work at the beginning too.  For the example, we want to go to the left.  I apologize for my paint skills...who would have thought that I'd be better at quilting perpendicular lines than drawing them on the computer?  I left it as is though, because I didn't want to make it too perfect.
 2.  Go a little bit past where you want to turn (the red line).
 3. Travel back on the line you just made and then when you reach the place where you want to make the turn go the opposite way of where you want to go.  (Blue line)
 4.  Travel back on the blue line and continue on in the way you wanted to turn. (Purple line)  Continue as desired to fill the space.
 A. Sometimes you get a little stuck, but you can just add an extra cross. (Green line)
 B. Travel back on your original line and turn off, making one of the legs.  (Red line)
 C.  Travel back on that leg, going beyond the main line.   Then travel back on that little leg to the main line, turn onto it and travel back down it. (Blue line)
 D. Once you reach a place to "escape", turn and go the wrong way, then travel back on that leg and go the correct way.  Continue on as desired. (Brown line.)


Tuesday, July 16, 2013

Simply Solids: August tutorial

Next month (August) is my month in the Simply Solids Bee!  I've debated for most of the year as to what I'm going to ask for, but finally chose one.
(This is really only half of the block.)
First of all, various credits...I saw the original inspiration on You Know What I Love?  (You can see the final quilt here.)  She in turn was inspired by the Tumbling Blocks Pillow.

Colors: I'm asking for scrappy blocks.  However, if you could make the strips green I'd prefer that.  If you don't have enough green please use grey (or black or white).  If you don't have enough of any of those colors let me know.  Feel free to make the small colored strips any color you would like.

Final product: I'd like you to send 2x 6 1/2" x 12 1/2" blocks...basically just don't sew the final seam to make it the 12 1/2" square.  I could say that it is because I don't know exactly what layout I want yet, but really it is because I want to be able to move the half blocks around to evenly distribute the colors.

Ok, let's get on with the tutorial.

Step 1: Cut out your green strips.  The strips should be 7" long and 1.75" to 3" wide.  I can't tell you how many you'll need since it will depend on your strip width, but probably 6 to 12 per half block, so 12 to 24 total.  (Note: if you have two strips of the same color but individually they're too short they will still work if they add up to about 8".)

Step 2: Cut your pieces in two.  Make sure to do some angling top to bottom and some bottom to top.  Vary the angle so some are steeper and some are shallower.  Change where you start the cut, although make sure it is at least an inch from the top or bottom.  (Note: if you have the two pieces are mentioned above, overlap them by .5" - 1" and cut so that the cut is only in the overlap part. Discard the two tiny pieces.)

Step 3: Add the color section.  Please made the width about 1.5" and make sure to give yourself some extra on the sides.  Sew the colored strip between the two green pieces.  The first side is easy, but the second side includes a little guess work because you want to try and line up the two strips as much as possible so that it comes out straight.  It will probably not turn out perfectly straight (see step 4).

Step 4: Trim the strip so that it is straight.  As a rule of thumb, if the strip is going to be much less than 1.5" you might want to try and resew the second green piece.

Step 5: Arrange the strips and sew together.  I'd prefer that you try to put all of the colored strips in the top half or center area (see paint diagram below).  Mine ended up a little more center than top, but I still tried to keep all of them somewhat clustered on the lower part of the top half.

Step 6: Trim to 6 1/2" x 12 1/2".  Here are the two that I ended up with...


Questions?  Comments?  Let me know.  I'm excited to see how these turn out!

Tuesday, October 2, 2012

Meandering Stars

I finished up quilting my mother-in-law's quilt this weekend.  For the most part, I really like it.  But I'm going to start with the things that I would have done differently if I had to do it again.

1) I would not have used a variegated thread.  (Or I would have used a variegated thread that didn't blend in at all.)  I felt like some of the lines of the stars blended in too well with the blue fabric, so some of the star points disappeared.  To me it looked like I just goofed in the meander and added some straight lines.

2) I would not have put large stars in the outer border without using a ruler.  I have to remind myself that straight lines are hard to get straight.  Now, all the stars have a few waves in them so they're at least uniform, but I don't love them.  I think that small stars in the red border and something else in the blue border would have been better.


But, as far as the main quilt design went, I think it turned out really well.  The stars were nice because if I found myself making a line too straight I could just put a star in.  It also matches the theme of the fabric well.


So that I remember some of the tricks I've learned (or if you wanted to try), here are the things to keep in mind.

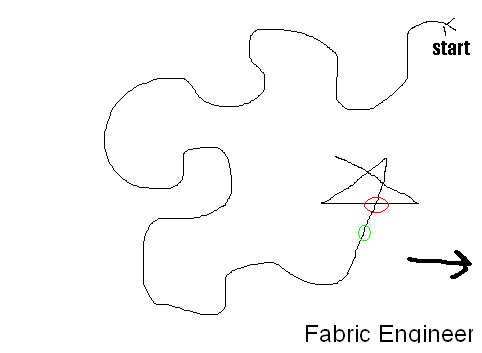
When making a star, the second straight line (after the first point) should go away from the direction that you want to go in the end.  (For the pictures below, you want to go in the direction of the arrow.)
Then you add the other legs and voila!  A star.


One common problem I had was forgetting to go the opposite direction for the second leg.  It isn't a big deal, you just need to be a little careful at the end.  Try to touch the line on the first leg without going over it too much.


The other common problem I had was ending up with a four pointed star.  You need to aim for the green circle, not the red circle.  The red circle seems like it should be correct because it is where two legs intersect, but it doesn't really work out.


Monday, September 24, 2012

Let's Get Aquainted Blog Hop

I have long legs.

It means that I'm often letting down the hem of pants so they fit better.  I finally asked for a sewing machine to help me with this task, because I wasn't doing a very good job.  Then I made a table cloth for our long table.  It was fun...so I decided to make a quilt for our bed.  It was enjoyable enough to make another.  I thought about stopping at this point, but I happened upon the blogging community and haven't looked back since. 

Here are the things I've finished this year.
Upper left: Window Boxes.  Upper middle: quilting.  Upper right: November Stars
Middle: Tetris
Lower left: Baby quilt.  Lower middle: locked hearts (in progress).  Lower right: Don't Touch Me
A few more (random) things about me:
*I have my masters degree in mechanical engineering but am currently a stay-at-home mom.
*I'm a Christian.  My favorite verse is from Philippians - "Rejoice in the Lord always; I will say it again, Rejoice!"
*I really like to be organized, although my sewing area doesn't portray that very well.
*I like to read, play board games, video games, and Frisbee.  (The current video game is mine craft.  I'm breeding bees while my husband does all the hard work to make our base usable.)

Here are some of the standard Q&A from Beth.
*How long have you been quilting?  About three years.
*Favorite quilting tip(s)?  Listen to your sewing machine
*Favorite blogging tip(s)?  Put a link at the top to show your finishes.  (Also, I really like it when I can read the whole post in Google reader.)
*Favorite fabric (or wish list fabric)?  Bright solids at the moment.
*Book you are currently reading?  I'm reading "Magician: Master" and the Little House on the Prairie series.
*Favorite quilting tool?  The rotary cutter.  I cut my first quilt out with a scissors because I didn't want to invest much if I didn't enjoy it and it took so long. 
*Favorite music to listen to while quilting?  Actually, I quilt by the computer so I usually have Netflix playing.
* Binding - by hand or by machine?  Machine.  I did a doll quilt by hand and it was not pretty.


I have a reversible coaster tutorial for today.


Total fabric requirements:  13" x 4.5" in three different colors

Cut the following from each of three different fabrics:
*6 of  4.5" x 1.5" strips
*4 of  4.5" x 1" strips

Sew them together using a 1/4 seam so that you have every color combination as shown in the picture.  (The picture is organized by middle stripe.  The left two have a light purple middle stripe, the ones in the middle have a dark purple, and the ones on the right have a white stripe.)

I finished my coasters using a similar method to the tutorial from Throw a Wrench in the Works.  Put two blocks right sides together.  (I put all the blocks with the same middle stripe together as shown above.)  Put a piece of batting the same size as the coasters (4.5"x 4.5") on one side.  Sew a 1/4 seam around the outside, leaving a 2" hole in the center of one side for turning it right-side out. Before I turned it right-side out, I trimmed the corners to reduce some of the bulk.  I then did a small topstich around the outside and was done!


 Thanks again to Beth for hosting this blog hop!
 Plum and June
Make sure to visit the others this week too!  Amanda from Material Girl Quilts today and Vicky from Vicky K Creating and Francine from Mocha Wild Child on Thursday. 

Tuesday, July 3, 2012

Followers

I wanted to name this post "How to make sure the people that you're following can see your blog using Google Friend Connect" but that seemed too long.

I always try to look at the blog of any new follower.  But for many people, it isn't listed.  When I went to see if my blog was listed in my profile, it wasn't there so I don't think that it is a default setting.  So, since it is tutorial day, here's what you do...

1) Go to the page of someone that you follow and click on your picture.  Hopefully you'll see your blog listed under Links.  Otherwise it's pretty easy to get it there.

2) Go to the blogger dashboard.  (I find the easiest way is by clicking the B in the upper left of my blog, but I'm sure there are other ways too.)

3) Click on the little down arrow by your name on the top right.  (Click the image to enlarge and see the red circle.)

4) Click Blogger Profile

5) Click Edit Profile in the upper right.

6) Click Select blogs to display
7) Click the blog(s) that you want to show up and then click save.
8) You should be all set, but I'd recommend going back to a blog you're following and clicking on your picture again to make sure it showed up.


Plum and June

Reaction Buttons

Some of you may have noticed that I recently put reaction buttons on the bottom of my posts.  These buttons are a nice way for people to quickly give feedback without having to actually write anything.  On my non-quilting blog they get used quite a bit, and it's nice to know that people read the posts.  (Beware though - the blogger has no idea who clicks the buttons.  So if readers want feedback or want to try and expand their own readership, comments should still be written.)

Do you want the buttons?  Here's how to put them on.  (You might want to click on some of the pictures to enlarge.)

1) Click the design link on your blog.


2) Click the layout link on the left side of the screen.

3)  On the "Blog Posts" area, click edit.

4) A pop-up window will appear.  Check the Reactions box.  Click edit if you want to change the reactions.

5) Put in your reactions, separated by commas.  Click save.

6) Enjoy!
Plum and June