I quilted another quilt for my mother-in-law. It is ultimately for my niece (and one for her doll).
Using a variegated pink/purple thread from King Tut, I put Leah Day's Lollipop flowers in the nine-patches. Don't you love that name for a quilting design? I probably still need some practice on doubling back on my quilting, but it wasn't too bad, especially if you don't look too closely. :) The sides received some lollipop vines, inspired by Melissa Corry's sidewalk chalk.
The castle areas received meandering stars. And the purple corners all received stars. It seems to be my standard design lately, but stars are so versatile. I used a light brown Auriful thread for this part.
Finally, here is the doll quilt. I keep the cord in the picture for a size perspective as the whole thing is about 15" square. I did the same quilting motifs, although the lollipop flowers didn't have as many leaves on them.
Linking up with Free Motion Friday.
Thursday, July 25, 2013
Saturday, July 20, 2013
Flames
I finished quilting my Fractured quilt. I wasn't really planning on quilting it this month, but the quilt I was hoping to have ready was still a long ways off. I love it!!!
I was thinking something like this would be nice, and then I saw Michèle-Renée's. She was nice enough to send me a close-up photo of hers I think mine ended up similar.
Friday, July 19, 2013
Simply Solids - July
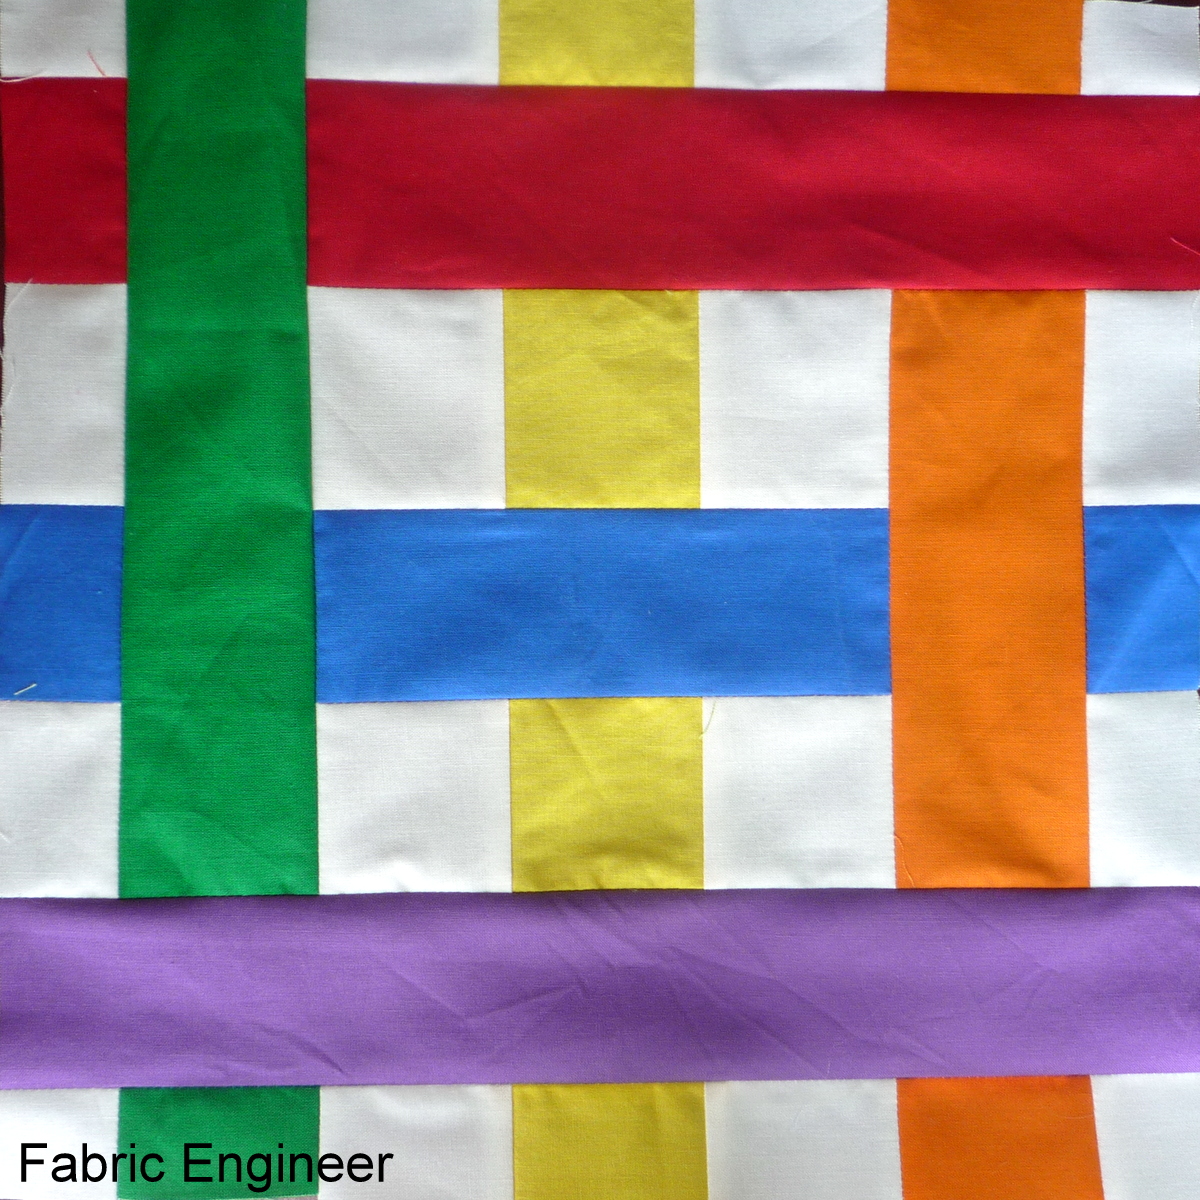
I finished the block for my July bee. It feels nice and summery to me. And, bonus, it was nice and easy to make.
The block is called Square Knot and the tutorial can be found here.
Tuesday, July 16, 2013
Simply Solids: August tutorial
Next month (August) is my month in the Simply Solids Bee! I've debated for most of the year as to what I'm going to ask for, but finally chose one.
First of all, various credits...I saw the original inspiration on You Know What I Love? (You can see the final quilt here.) She in turn was inspired by the Tumbling Blocks Pillow.
Colors: I'm asking for scrappy blocks. However, if you could make the strips green I'd prefer that. If you don't have enough green please use grey (or black or white). If you don't have enough of any of those colors let me know. Feel free to make the small colored strips any color you would like.
Final product: I'd like you to send 2x 6 1/2" x 12 1/2" blocks...basically just don't sew the final seam to make it the 12 1/2" square. I could say that it is because I don't know exactly what layout I want yet, but really it is because I want to be able to move the half blocks around to evenly distribute the colors.
Ok, let's get on with the tutorial.
Step 1: Cut out your green strips. The strips should be 7" long and 1.75" to 3" wide. I can't tell you how many you'll need since it will depend on your strip width, but probably 6 to 12 per half block, so 12 to 24 total. (Note: if you have two strips of the same color but individually they're too short they will still work if they add up to about 8".)
Step 2: Cut your pieces in two. Make sure to do some angling top to bottom and some bottom to top. Vary the angle so some are steeper and some are shallower. Change where you start the cut, although make sure it is at least an inch from the top or bottom. (Note: if you have the two pieces are mentioned above, overlap them by .5" - 1" and cut so that the cut is only in the overlap part. Discard the two tiny pieces.)
Step 3: Add the color section. Please made the width about 1.5" and make sure to give yourself some extra on the sides. Sew the colored strip between the two green pieces. The first side is easy, but the second side includes a little guess work because you want to try and line up the two strips as much as possible so that it comes out straight. It will probably not turn out perfectly straight (see step 4).
Step 4: Trim the strip so that it is straight. As a rule of thumb, if the strip is going to be much less than 1.5" you might want to try and resew the second green piece.
Step 5: Arrange the strips and sew together. I'd prefer that you try to put all of the colored strips in the top half or center area (see paint diagram below). Mine ended up a little more center than top, but I still tried to keep all of them somewhat clustered on the lower part of the top half.
Step 6: Trim to 6 1/2" x 12 1/2". Here are the two that I ended up with...
Questions? Comments? Let me know. I'm excited to see how these turn out!
| (This is really only half of the block.) |
Colors: I'm asking for scrappy blocks. However, if you could make the strips green I'd prefer that. If you don't have enough green please use grey (or black or white). If you don't have enough of any of those colors let me know. Feel free to make the small colored strips any color you would like.
Final product: I'd like you to send 2x 6 1/2" x 12 1/2" blocks...basically just don't sew the final seam to make it the 12 1/2" square. I could say that it is because I don't know exactly what layout I want yet, but really it is because I want to be able to move the half blocks around to evenly distribute the colors.
Ok, let's get on with the tutorial.
Step 1: Cut out your green strips. The strips should be 7" long and 1.75" to 3" wide. I can't tell you how many you'll need since it will depend on your strip width, but probably 6 to 12 per half block, so 12 to 24 total. (Note: if you have two strips of the same color but individually they're too short they will still work if they add up to about 8".)
Step 2: Cut your pieces in two. Make sure to do some angling top to bottom and some bottom to top. Vary the angle so some are steeper and some are shallower. Change where you start the cut, although make sure it is at least an inch from the top or bottom. (Note: if you have the two pieces are mentioned above, overlap them by .5" - 1" and cut so that the cut is only in the overlap part. Discard the two tiny pieces.)
Step 3: Add the color section. Please made the width about 1.5" and make sure to give yourself some extra on the sides. Sew the colored strip between the two green pieces. The first side is easy, but the second side includes a little guess work because you want to try and line up the two strips as much as possible so that it comes out straight. It will probably not turn out perfectly straight (see step 4).
Step 4: Trim the strip so that it is straight. As a rule of thumb, if the strip is going to be much less than 1.5" you might want to try and resew the second green piece.
Step 5: Arrange the strips and sew together. I'd prefer that you try to put all of the colored strips in the top half or center area (see paint diagram below). Mine ended up a little more center than top, but I still tried to keep all of them somewhat clustered on the lower part of the top half.
Step 6: Trim to 6 1/2" x 12 1/2". Here are the two that I ended up with...
Questions? Comments? Let me know. I'm excited to see how these turn out!
Monday, July 15, 2013
Mail!
I've received some mail during the last week. First up...a thread sample from Glide. I was really excited to get so much thread, but...red. It's a hard color to actually use to give it a good test.
Lisa from Hilltop House Creative Works sent me this lovely box of goodies (plus some chocolate) for sending her a partially finished pattern. (I think I got the better end of the deal!) I've never used zippers before, so I'm especially excited to try them.
Tuesday, July 9, 2013
Finished quilt
A bit ago my friend used my midarm. The whole process went pretty well... I think we were both a little nervous, but everything went very well. She was about to take some pictures of the back and what does my son do? Sits right down on it and makes himself at home.
After it had been rolled up he tried to take it away for himself. When that didn't work, he pulled me over to the quilt to take it. That didn't work either, but at least he's coming to love quilts. :)
Monday, July 1, 2013
June accomplishments, July goals
June was a pretty good month for me, but I don't feel as though I got as much done as I normally did. But it was a fun (and busy) month in other regards.
Anyway, here's the round-up for June:
1. Finish baby quilt from jelly roll. Done!
2. Piece the T-shirt quilt Not done. I still have some of center seams to put together and the borders.
3. June Simply Solids block. Done!
13. Quilt castle quilt The quilt is finished, although there are still a few threads to hide. I also have a matching doll quilt that goes with it and that is about half finished.
16. Rocket pattern I redid the pattern based on some feedback but need to make it again.
July is looking pretty busy too. I tried to keep my main three goals reasonable, but am not sure that I did. Furthermore, I added a lot of things that I want to make. I figure it's good to have options.
My top goal, for a lovely year of finishes, is to
1. Finish the T-shirt quilt. Honestly, I'm not sure I'll be able to get it all done based on July activities. But I'll try!
I'd also like to try really hard to:
2. Make the July Simply Solids block and the tutorial for the August block.
3. Finish the castle quilts.
And the other things that are still on the list, hanging out:
4. Finish countdown and rocket
5. Quilt the fractured quilt.
7. pretend to work on scrap quilt.
8. finish green coasters.
9. Aunt's throw.
10. Pillow for family room.
11. Jeweled floors.
12. Picture quilt (finish by Christmas).
13. Charmed baby quilt (October)
14. One-up mushroom (October)
15. Rocket pattern
16. Lost piece (almost whole cloth quilt)
17. Baby girl daisy quilt
18. Surprise mini (Christmas)
Subscribe to:
Posts (Atom)