Showing posts with label pebbles. Show all posts

Sunday, March 26, 2023

Finished: Begonia

Begonia is finished!  I know this isn't a great picture, but it's the best one I have that shows the whole quilt.


I got the pattern from the Seattle MQG and I loved it.  This is absolutely a pattern I'd make again, and I don't say that very often.  I really like how it turned out and I enjoyed the medallion style of the quilt.  If I had to do it again though I might choose a white background; the light grey didn't quite do it for me.  The Kona colors I used include: quicksilver, splash, nautical, marine, pacific, Malibu, Paris blue, horizon, spa blue, blue, and breeze.

I am going to admit, I made a ton of mistakes with this quilt.  (Through absolutely no fault of the instructions.)  It's been a while so I've forgotten several, but the big ones include realizing I put one of the outer rows on backwards after I had it loaded on the quilter and had just started quilting.  I didn't require a lot of unpicking, but it did take several hours to get back to the same spot.  Then I had started with some cool quilting in the top corners, but by the time I got to the bottom corners I had forgotten and just did some pebbles.  So that was another unload, unpick, and reload.  I wouldn't call myself a perfectionist at all, but these were big enough errors that I wouldn't have been happy with the result if I had left them.

For the quilting, I did a variety of motifs.  In the center I did some straight lines that formed a star.  in the oddly shaped grey sections I added pebbles.  I created some squares and rectangles in the larger grey spaces.  And I skipped all the colored pieces, so they could pop a bit more.

So, while it took much longer than I was hoping, I'm really proud of the end result.


Monday, November 21, 2016

Stash Bee quilt - finished!

I was part of a quilting bee this year.  This bee is exactly what I was looking for in a bee.  The rules and guidelines are there, but there are few limitations on what you can choose for your block.  I received all my blocks within two months and the last person was in communication and so I knew that she just needed more time.  (It seems like a small thing, but previous bees haven't gone that well.  Not bad, but this one has been the best.)  It might have been fun if hive had been a bit more social, but it's not as though I did anything to promote that and everyone, including myself, is busy.  I'm hoping to do it again next year and will find out in December if I got in.

This year I choose a random HST in grey scale with pops of color.


I asked for the other members to use at least three different shades in the white to black spectrum, all solids.  Because I do love my solids.  One of the triangles was to be a different color.  I did let them know that it was going to be for a boy, so that's why there are more blues than some of the other colors.


People also sent enough extras for me to make an additional long row.  There was a reason at the time I added the extra row...maybe to balance out the shades a bit?  I don't remember, but since I can't tell I'm going to assume that it worked well.


The squares all lined up very well.  It helped to have nesting seams, but apparently my bee-mates were also great at the quarter inch seam.


I backed it with grey minky and bound it in sateen, per normal.  For quilting I did wavy lines, except for the colored triangles.  In those I did some pebbles.  It was nice and fast, something I was looking for after the previous quilt, while still having in interesting element.


Linking up with Finish It Up Friday.

Thursday, January 22, 2015

Metro Lattice

I finished Metro Lattice!  It was made with the quick curve ruler.  I didn't have perfect piecing, but it still went together so quickly.  I wasn't really trying to get this one done until June, but before I knew it I had a top.


I love it.  It is probably one of my favorites.  And there was a big snowfall, so everything was looking so pretty outside.

I bound it in coordinating colors.  I think it brings the quilt together so nicely.

I did pebbles and arcs in the pinwheels, back and forths in the middle parts, and echoes in the white sashing.  I realized there was a long arm ruler after I had quilted all of it...it probably would have been easier to use than my cardboard templates.  But the templates worked fine, especially since everything didn't line up perfectly.  I did a lot of ruler work on this quilt and feel like I'm finally starting to get the rhythm down a bit more.

This is also the first quilt that I put an official tag on!  I always tell people how to wash the quilts, but I'm not sure that it sticks.  So I have a tag with my name and the washing instructions.

Finally, I made my first pillow with the scraps using this tutorial.

It was a gift for a friend's daughter.  While most of the fabrics are unique to hers, there are some orange fireflies that are also on her brother's quilt.  I'll admit, I probably wouldn't have done that except that the orange was just perfect.  (Of  course, I don't have a close up of the fireflies.)  I've been told that her brother's quilt has suddenly become more popular now that they both have one.

Linking up with Link a Finish Friday, Whoop Whoop Friday, Finish it up Friday, TGIFF, Fabric Frenzy Friday, Fabric Tuesday, Sew cute Tuesday, and Linky Tuesday.

Friday, September 26, 2014

T-shirt quilt 2

My friend is about to return overseas, so I wanted to make sure that I got this to her before she left!  It is a sister quilt to her husband's.
 

The back is grey polka dots on a black background.  I used matching threads in the borders and sashing, and I like how the yellow pebbles stand out so much.

The T-shirts are trying to escape the dresser!  (Otherwise known as me trying to find interesting pictures.)

Here are some of my favorite blocks.  This one I traced around the continents.  I did it to make sure that there was enough quilting for the batting, but it made it pop nicely.

I have this same shirt and it is one of my favorites...so comfortable! 

This one is funny because my friend lived in a cottage called DeGraaf for a year or two.


This one shows my continued effort to drape a quilt casually yet artfully.  I won't show you all the outtakes.

And one more showing the back.  You can see the border quilting best here.  (Hmm...if you zoom in on the picture.  I need to do a better job photographing quilting.)  Figure eights in the green border, back and forths in the blue border, and double straight lines in the yellow.  For the green and blue borders I used a tip from Amy's Free Motion Quilting Adventures and used a plastic grid and pounce pad to put a grid in the quilt.  This helped me keep everything a bit more evenly lined up while not taking up too much extra time.

edit: I realized I forgot to give some credit for the design (again!).  The original was seen here.
Linking up with Whoop-whoop Friday, Link a finish Friday, and Finish It Up Friday.

Friday, August 15, 2014

Treasure Map

I finished my son's quilt a few days before he arrived.  (Although as I took the pictures I realized there were some loose threads in the back...so it is only functionally finished.)


It is the Treasure Map from Pixel Play by Emily Cier.  It is supposed to be twin sized, but I shunk everything in half and decided in the beginning it would be ok if it wasn't perfect.  (It also meant that I had many squares with a finished size if 1/2" by 1/2".)

Now, I've had tons of time to stare at the quilt in its finished state, but there are so many issues.  Since the blocks are small lining them up was hard.  The smallness also created a ton of very noticeable wrinkles when quilting,  I ran out of ocean and ordered more, but the dye lot is different...and easily seen in the 3am lighting that I have.  The quilt is not square.  I missed quilting a few small places.


But...it was made with love and has already gotten a lot of use.  I'm happy with how it turned out, overall.


I quilted the water with ocean currents (or swirls) and the land with pebbles.  The outside border has a cross-hatch that pretends to be straight.  I was going to do some cool tree trunks and leaves but with all the wrinkles decided that I shouldn't.


The back is a light blue minky.  It's fun to see the different colored threads on the back.


There are several more quilts that I really like in the book...but it'll probably be a while before I'm ready to do another.

Joining up with LAAF whoop-whoop Friday and Finish it up Friday.

Sunday, July 27, 2014

world and paper airplanes

I've been on a roll finishing quilts this week!  First up, the map and paper airplane quilt.  It is for a lovely, although unmet, girl who made her appearance in the world about six months ago.  The family is currently in the middle east, but they're coming home for a vacation in a month...so it'll be just the right time to give it to her!


The center is a panel that doesn't seem to be around much anymore.  The paper airplanes where designed by Kristy from Quiet Play and you can find the (free!) pattern here.


This quilt had several firsts...the first time I experimented with tea dying and the first time I did a bit of hand quilting.  I ended up doing tea dying because I didn't look at the pattern closely enough before buying the fabric and didn't realize that I needed three different fabrics.  So I solved it by dying the inner fold and giving the paper a white back.  My biggest fear is that the tea stain will fade over time or over washes, but I'll probably never find out.


I also did a bit of hand quilting to make the flying lines.  They're hard to see...the thread I choose was a little bit too light.  But they're there, all nice and chunky.  It was a nice thing to do while my son played outside, so I might need to work on getting a small quilt top ready this winter for next summer and only hand quilt it.


Lastly, the quilting.  The sea and air have swirls.  I used a varigated blue and white by Aurifil...it was getting near the end of the spool and I had a few more breaks than I normally do with Aurifil thread.  The continents are pebbled (because land has rocks) with a thread color that matched the continent color.  Oh, and the red border has wonky diamonds.


Tuesday, October 15, 2013

1-up - finished!

The 1-up quilt is finished!  It was requested by a friend and based on Cut to Pieces Super Mario Bros. QAL.  I added the clouds and ground so that it would be rectangular.

I found some fabric with squares on it for the back, to keep with the pixelated idea.

Quilting took a rather long time on this quilt, although it could be that school started up around the same time so I just had less time overall.  For most of the sky I put squares and rectangles, but also added a few Easter eggs.  I know they're hard to see, but that was kind of the point.

Some bricks and question marks,
source: http://www.giantbomb.com/mario-block/3055-702/images/


some mountians,
source: http://www.smashingmagazine.com/smashing-newsletter-issue-50/

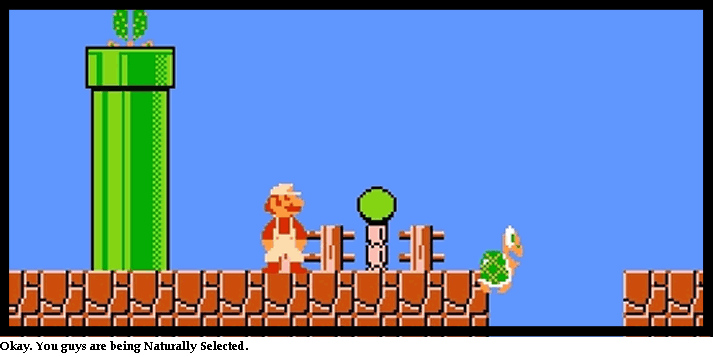
and a pipe.
source: http://gamecola.net/2006/01/what-the-crap-super-mario-bros/
You can also see in the picture above that I did back and forths for the grass and square pebbles for the dirt.

Finally, the 1-up dude was mostly done using a maze pattern, with back and forths in the black area.  The thread always matched the fabric color.

The quilt was bound so that the binding matched the quilt.  (So it is sky blue for the sky area and brown for the dirt area.)  (I had a picture for this, but really it's easier to see on the quilting close-ups above.)

And finally, no video game quilt would be complete without a picture of some controllers.  Now, if he only had hands.

This is my finish for A Lovely Year of Finishes!

Monday, August 26, 2013

T-shirt quilt

Hooray!  Another finish!  They seem to come in clumps.

The T-shirt quilt is finished.

I put a very simple Irish Chain on the back.  I had been expecting to do something very simple, like stripes, but this looked like fun.  There's also a hint of orange around three of the sides.  I didn't have quite enough grey fabric and then didn't center it absolutely perfectly, hence orange on only three sides.  But the orange isn't on the top, so it doesn't feel off-kilter to me.

I'm going to admit; T-shirt quilts aren't my favorite.  I had fun with the borders and the back, but the T-shirts don't hold any memories for me.  I listened to the recipient recall fond memories when I gave the quilt to him though, and it was nice to hear how much it was (and will be) loved.

This ended up being my favorite block after an "oh no!  What have I done?" moment.  I cut the panel way too small.  After weighing my options, I decided to cut another strip from the shirt and put it on.  Well, on the bottom of the shirt was another little graphic.  So I added it and now it looks like it was supposed to be there!


I stippled the T-shirt panels, but didn't quilt over the screen printing.  I put pebbles in the sashing, figure eights in the blue border, back and forths in the orange border, and double lines in the outer green border.  The green and blue borders contained patterns that I hadn't done before and I think they turned out pretty well on the whole.

I did the border quilting in different colors...I thought it would look cool on the back.


My son took a liking to this quilt.  He semi-escaped onto the deck while I was taking pictures and made a beeline to it.  He then made my husband and I lay on it with him.  So we had some fun family time.

I finally packaged it all up (using a folding tutorial from here).   Everytime I made a fold my son put more balls on the quilt.  I think he was trying to say that if his toy balls were on the quilt then it was his.

edit: I realized I forgot to give some credit for the design.  The original was seen here.

This is my finish for a lovely year of finishes! Also linking up with Fabric Tuesday and Linky Tuesday.